

How To Set Frame Size In Premiere Pro

TheScale to Frame Size and the Fit to Frame Size features in Premiere Pro sound like they do the same thing, but they don't. Plus, their names are not all that logical, so people tend to misinterpret what they do. I wrote an article for the Film Editing Pro blog named "The Editor's Guide To Working With Still Images In Premiere Pro" where this was just one of many topics. You can read the whole article on their web pages. Here's an excerpt from the article, about Sale/Set to Frame Size.
Scale to Frame Size vs Fit to Frame Size in Premiere Pro
If you want images and video to always scale to fit inside the size of the sequence, you can use one of two methods: Scale to Frame Size or Fit to Frame Size. They can both be found in the right-click menu for clips in the timeline, and in the Clip menu, under Video Options.

Scale vs Fit to Frame Size in Premiere Pro
So, what's the difference?
Scale to Frame Size
The Scale to Frame Size option will resample your image at the size of the sequence. So, if you use this on an image that's double the width of the sequence, you end up with an image that's ¼ of the original pixel size, while the Scale will be set to 100%. This is a great way to reduce the strain on the system, but it will degrade the image if you scale it further.
Set to Frame Size
The Set to Frame Size option, on the other hand, will not resample the image, but instead set Scale in the Effect Controls panel to whatever it needs to be to fit the image inside the frame. In my case, since the image is 3840 px wide, that's 50% for a 16/9 image. All the pixels are still intact, which is great when you want to scale the image further in the Effect Controls panel, but you'll need more computer power.
How to use them
Scale to Frame Size is also available in the bin. Select the clips you want to automatically scale to frame size, and click Clip > Video Options > Scale to Frame Size . When you put the clips on the timeline, they will auto-scale.
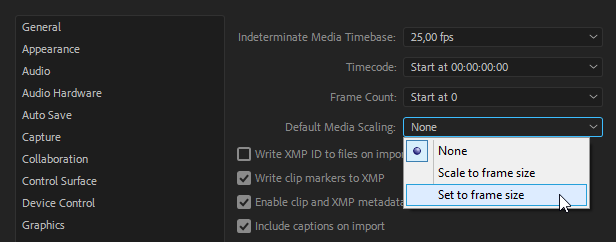
If you use this feature all the time, you should set this in your preferences. Click Preferences > Media > Default Media Scaling , and set it to Set to Frame Size. Or use Scale to Frame Size to reduce the strain on the computer, and remember to change it to Set to Frame Size for the clips you want to scale further, before you start scaling them.
Default Scale or Fit to Frame Size
In reality, the Scale/Set to Frame Size options are not as useful as you'd think. Most images from a DSLR will not be 16/9 aspect ratio, so the scaling will result in letterbox or pillar box looks with black bars.

Black Bars after Scaling or Fitting to Frame Size
A much better approach is to create a Motion preset that scales the images to the desired size, so you don't get any black bars.
Make Scaling Presets
To make a preset like this, set scale to whatever it needs to be to fill the whole frame. In my case, it was 50%. Then right-click on the word Motion in the Effect Controls panel and choose Save Preset . Name it 50% Scale or something similar. Next time you need to scale 70 images, just select them all in the timeline, and throw this preset on one of them. Perfect scaling in less than a second!
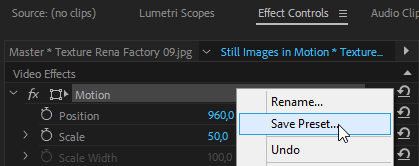
Save Preset
Result of scaling with the preset. No black bars!
To learn a lot more about working with Still images in Premiere Pro, read my article "The Editor's Guide To Working With Still Images In Premiere Pro" on the Film Editing Pro blog.
How To Set Frame Size In Premiere Pro
Source: https://premierepro.net/scale-frame-size-vs-fit-frame-size/
Posted by: jacobtures1972.blogspot.com
0 Response to "How To Set Frame Size In Premiere Pro"
Post a Comment